Table of Contents
Adding a Custom Field to a Listing
Editing a Custom Field on a Listing
Removing a Custom Field from a Listing
Importing Custom Fields from Bigcommerce
Managing Product Rules from Bigcommerce
Managing Option Rules from SureDone
Option Sets and Option Management
Editing an Existing Option Set
Removing an Existing Option Set
Adding an Existing Option to an Option Set
Adding a New Option to an Option Set
Removing an Option from an Option Set
Adding an Option Value to an Option
Removing an Option Value from an Option
Importing Products from Bigcommerce
Importing Option Sets and Option Data from Bigcommerce
Overview of Big Commerce Custom Fields, Options and Option Sets
SureDone has added new functionality to its Bigcommerce integration. Users will now be able to manage their Bigcommerce Option Sets, Options, and Custom Fields from within SureDone.
Custom Field labels can now be managed from your Bigcommerce plugin settings page. While listing your items to Bigcommerce, you’ll be able to assign Bigcommerce custom fields and values to your products, and have those field names and values appear in the “Other Details” section of your product on the Bigcommerce listing.
Generally, the way you’ll add a new custom field to an item will be to follow these steps. Create the New Custom Field name from the Custom Fields modal on the Bigcommerce Plugin Settings page. Next, add a custom field to your listing on the Editor page. Finally, list your item to Bigcommerce and the Bigcommerce Custom Fields that were entered for that item will be shown on the listing for that product.
In addition to Custom Fields, SureDone now provides the option to manage product rules from inside SureDone, rather than from Bigcommerce. The Product Rule Management section covers this in more detail. If you elect to manage your product rules from SureDone, you will be able to set fixed product rules for price, weight, and image for variation parents and children in Bigcommerce.
SureDone has also added the ability to import, create, edit, and remove Option Sets, Options, and Option Values from within SureDone, in the Option Set Manager, which is covered in the Option Sets and Option Management section. You will be able to create or remove Option Sets and add or remove options from those option sets. Creating and removing options, marking them as required, and adding values to options will also be possible. As a note, the types of options you can create are: Radio Lists, Rectangle Lists, Select Boxes, and Color Swatches.
A quick note about terminology: in this document, Custom Fields and Bigcommerce Custom Fields are sometimes used interchangeably. As a reminder, this guide will not be referring, at any point, to User Custom Fields found in the Custom Fields section of the Editor page (and Advanced Settings). Every mention of Custom Fields will be in reference to Bigcommerce Custom Fields found in the Custom Fields modal on the Editor or Bigcommerce Plugin settings page.
Custom Fields
Creating a New Custom Field
In order to create a new custom field, first go to the Bigcommerce settings page (Settings > Plugins > Bigcommerce). Next, click the “Custom Fields” link at the bottom of the page.

Clicking this link will open the Custom Fields modal, shown here:
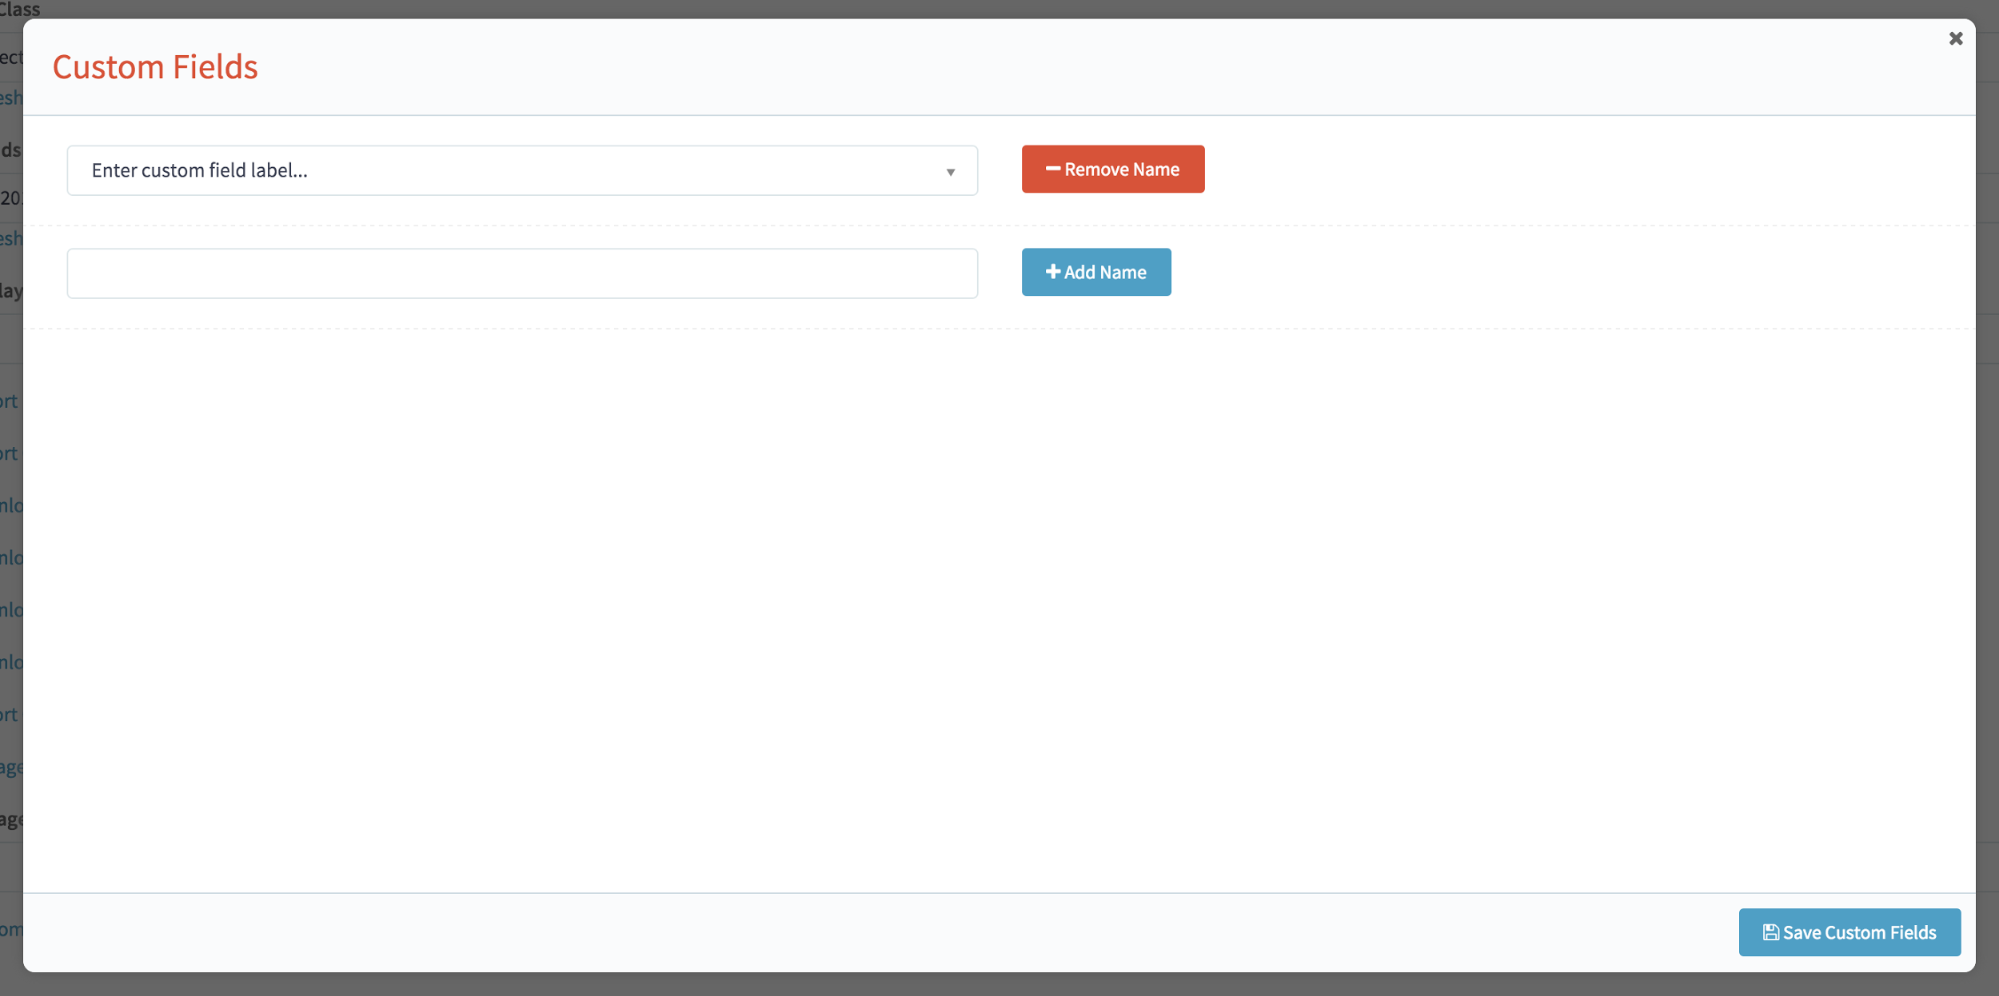
To create a new Bigcommerce custom field, type the name of new field into the “Add Name” text field, as shown.

Next, click the “Add Name” button next to the field, and your new Bigcommerce custom field will be added to the list of Custom Fields in the upper left corner of the Custom Fields modal.

Finally, click the “Save Custom Fields” button in the bottom right corner of the modal to save your new Bigcommerce Custom Field. Now, your newly created Custom ield will be available to use when listing items to Bigcommerce from SureDone.

Removing a Custom Field
To remove a custom field, first go to the Bigcommerce settings page in SureDone (Settings > Plugins > Bigcommerce). Next, click the “Custom Fields” link at the bottom of the page.
Clicking this link will open the Custom Fields modal, shown here:
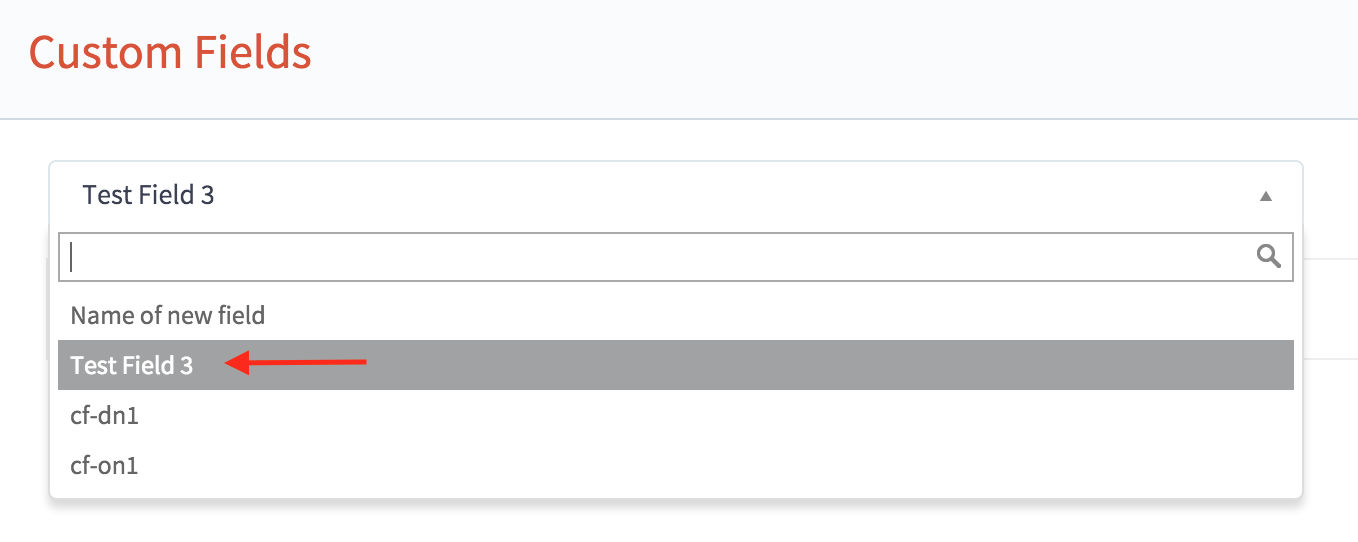
Then, in the dropdown at the top of the page, find the name of the custom field you’d like to remove.
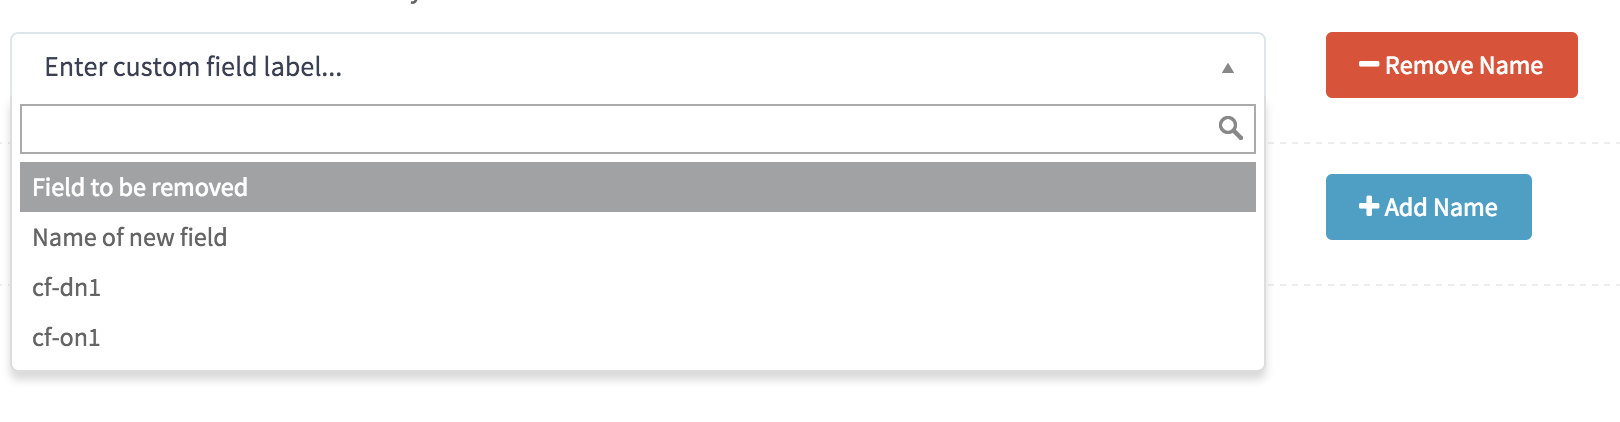
Next, click the name of the field you’d like to remove.

Once the name of the field you want to remove is displayed in the drop down, click the “Remove Name” button to remove it from the list of Bigcommerce custom fields. Once this has been done, the modal will display a message confirming the field has been removed.

Finally, click the “Save Custom Fields” button in the bottom right corner of the modal to save your changes to the list of Bigcommerce custom fields. Now, the custom field you removed will no longer be available to use when listing items to Bigcommerce from SureDone.
Adding a Custom Field to a Listing
To add a custom field and an associated value to a Bigcommerce listing, first go to a listing in SureDone -- these steps can be performed on a new listing, or an existing one. Next, click on the “Manage Custom Fields” link at the bottom of the Bigcommerce section.
Clicking “Manage Custom Fields” opens the Custom Fields modal. From there, you’ll be able to add Bigcommerce custom fields and values to your listing.
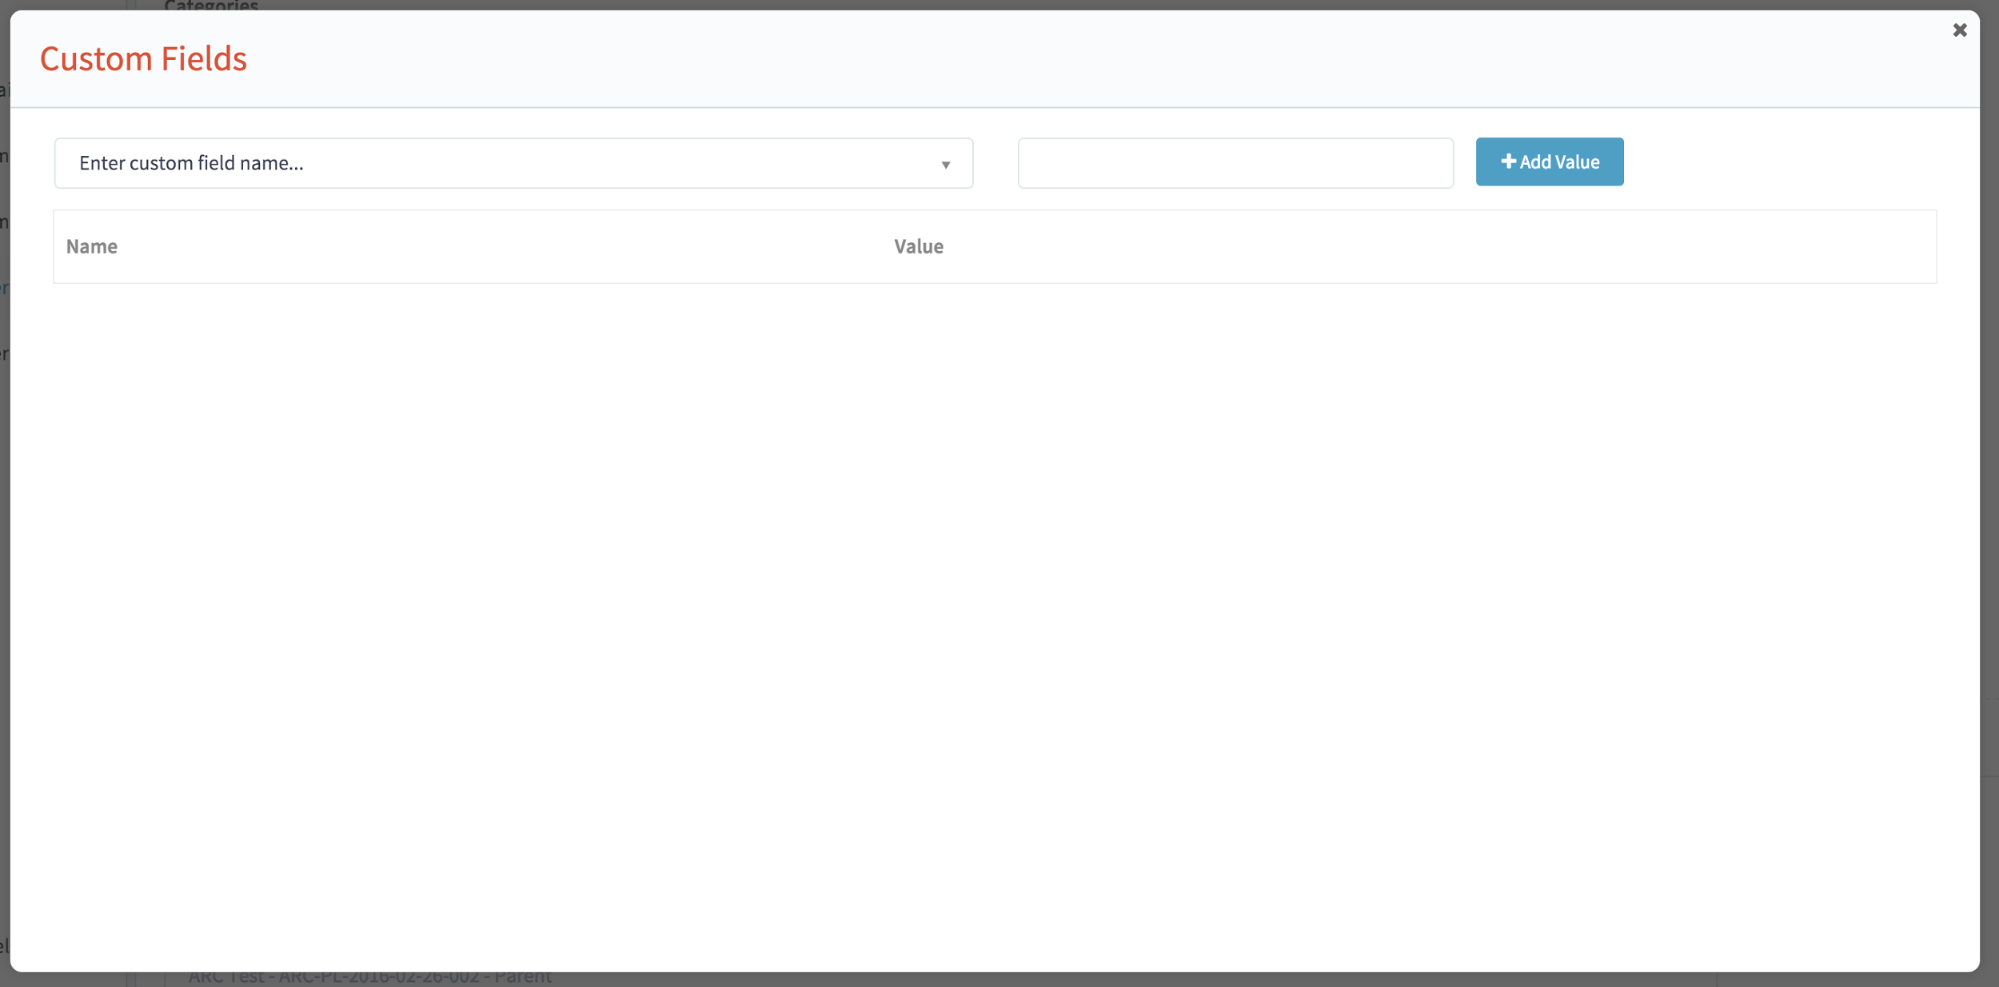
To add a Bigcommerce custom field and value, first select a Bigcommerce custom field name from the dropdown in the top left of the Custom Field modal by clicking the name of the Bigcommerce custom field. You may also type the name of the field to filter down the list.
The name of the Bigcommerce custom field will be displayed in the collapsed dropdown once it has been selected.

Next, enter a value in the adjacent text field. This will be the value associated with the selected Bigcommerce custom field for this listing.

Then, click the “Add Value” button next to the text field.

To add more Bigcommerce custom fields and values to this listing, just repeat these steps.
When you’re finished adding custom fields, click the X in the top right corner of the Custom Fields modal to close the modal and return to your listing.
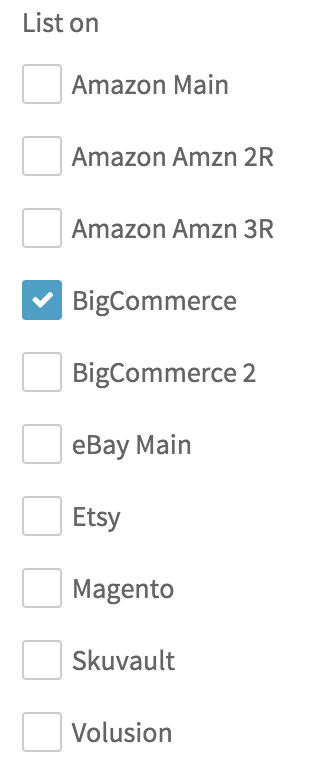
To send your listing’s Bigcommerce custom fields to your Bigcommerce store, make sure its entry on the “List on” field is checked.
Then, click the “Update” button, this will send your Bigcommerce custom fields and values to your Bigcommerce store.

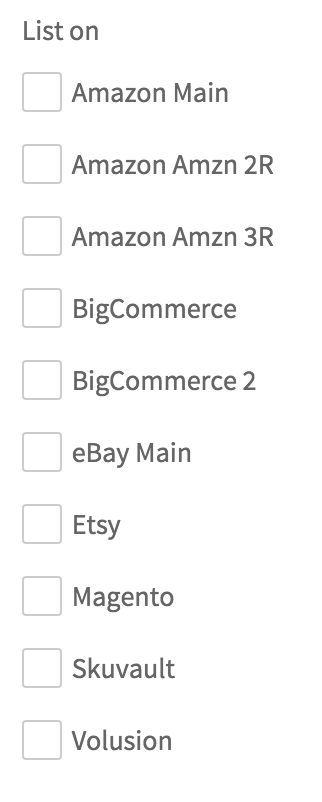
To save the Bigcommerce custom fields and values to the listing on SureDone only (no updates to Bigcommerce), make sure you’ve unchecked all of your sales channels in the “List on” section.
Then, click the “Update” button at the bottom of the page.
Editing a Custom Field on a Listing
To edit a Bigcommerce custom field on a listing, first open that listing in SureDone. Next, open the Custom Field modal in that listing by clicking the “Manage Custom Fields” link. The modal will open, and the previously added Bigcommerce custom fields and values will be shown inside.
The “Value” fields are text fields, and can be edited simply by clicking inside them and changing the text.

To edit more Bigcommerce custom fields and values, just repeat these steps.
To send your listing’s edited Bigcommerce custom fields to your Bigcommerce store, make sure its entry on the “List on” field is checked.
Then, click the “Update” button, this will send your edited Bigcommerce custom fields and values to your Bigcommerce store.

To save the Bigcommerce custom fields and values to the listing on SureDone only (no updates to Bigcommerce), make sure you’ve unchecked all of your sales channels in the “List on” section.
Then, click the “Update” button at the bottom of the page.
Removing a Custom Field from a Listing
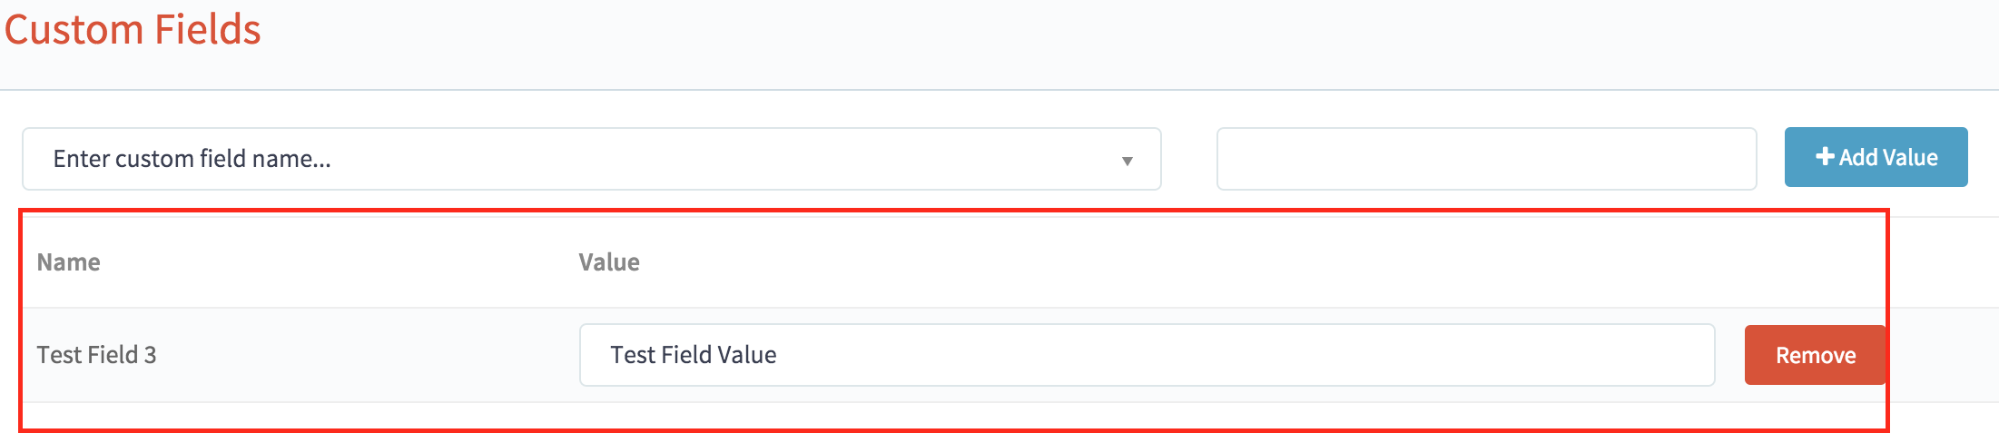
In order to remove a Bigcommerce custom field from a listing, first open that listing in SureDone, and open the Custom Fields modal by clicking the “Manage Custom Fields” link. You will be able to see the list of Bigcommerce custom field names and values for that listing in the modal.
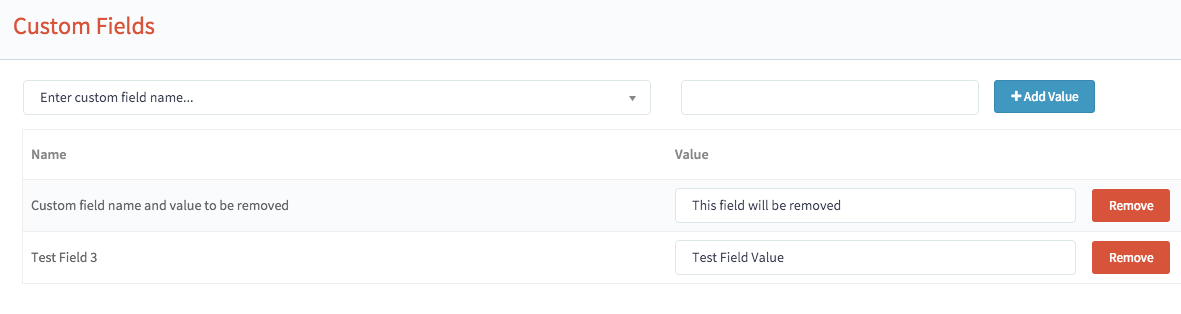
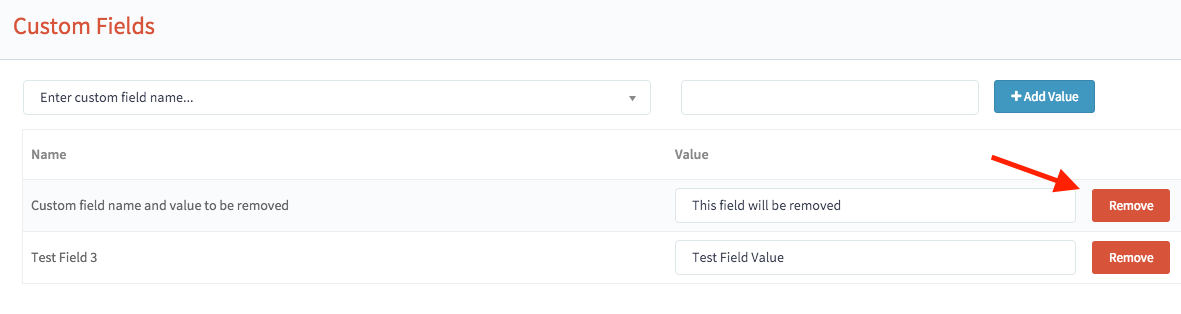
Note the “Remove” button to the right of each Bigcommerce custom field name and value.
To remove a Bigcommerce custom field from a listing, click the “Remove” button next to the name and value that you would like to remove. The name and value will be removed from the modal.
Before clicking remove:
After clicking remove:
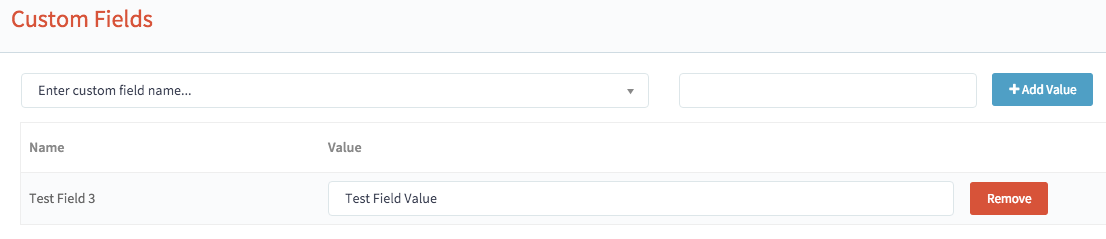
To remove more Bigcommerce custom fields and values, just repeat these steps.
To remove the Bigcommerce custom fields and values from your Bigcommerce store, make sure its entry on the “List on” field is checked.
Then, click the “Update” button to remove those Bigcommerce custom fields and values to your Bigcommerce store.
To remove the custom field(s) and value(s) on SureDone only (no Bigcommerce update), make sure you’ve unchecked all of your sales channels in the “List on” section.
Then, click the “Update” button at the bottom of the page.
Product Rule Management
Bigcommerce product rules can now be managed from SureDone. Users will have the option to continue managing product inside Bigcommerce, along with their option set rules, with no change in current SureDone functionality.
Product rules will only be applied to variations (base products with multiple SKUs in Bigcommerce), because Bigcommerce manages the differences between variations using rules.
Using product rules from SureDone, you will be able to change the price, weight, and images of variations of a base product. These rules will all be of a fixed type, rather than additive, meaning that it sets the price or weight value directly, rather than using a relative value (e.g., “+$5” makes the price $5 higher, whatever the price was before the rule was applied).
Managing Product Rules from Bigcommerce
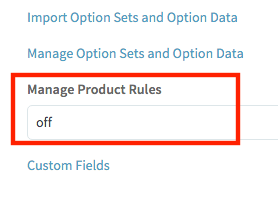
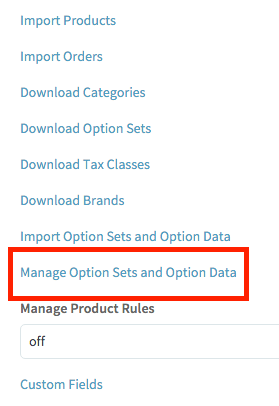
In Bigcommerce settings (Settings > Plugins > Bigcommerce), users will have access to a new setting, Manage Product Rules. It may be set to either ON or OFF.
Setting it to OFF means the user will not be able to manage Options Sets and Options from inside SureDone, and will have to perform all of their management of Option Sets and Options from within Bigcommerce.
Turning this setting OFF means the user will not be able to manage product rules from inside SureDone. All management of product rules will have to be done from within Bigcommerce instead. This means that regardless of what images, price, and weight are in SureDone for the variants/children; we will only send the information from the parent to the base product in Bigcommerce. Altering this information on a child-SKU level will be managed directly in Bigcommerce only.
Managing Option Rules from SureDone
In Bigcommerce settings (Settings > Plugins > Bigcommerce), users will have access to a new setting, Manage Product Rules. It may be set to either ON or OFF.
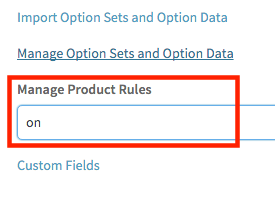
Setting it to ON means the user will be able to manage product rules from within SureDone.
On the Editor page, there is a reminder in the Bigcommerce section, when you are in the parent of a variation, that lets you know whether your product rules are managed by SureDone or by Bigcommerce.
When your products are imported (or created with this setting OFF), we will leave them so that the rules are managed directly in Bigcommerce (See here). If your product rules are managed by Bigcommerce, you will see this in the Bigcommerce section:

While this setting is ON, new products will have their rules managed by SureDone and editing existing products will move the rule management to SureDone also. If your product rules are managed by SureDone, you will see this in the Bigcommerce section:

When rules are created on SureDone and pushed to Bigcommerce it will now create absolute product rules for the product, and any variations that may be part of that product, on Bigcommerce.
These product rules will supercede any option rules that may conflict with them because they are absolute, this is part of Bigcommerce’s normal behavior for product rule and option set rule interactions. However, we will not remove any existing rules and if other rules exist for settings not controlled by SureDone (such as availability) they will remain in effect.
Each item in the variation (represented by a GUID in SureDone, or a SKU in Bigcommerce) will receive exactly one product rule that alters its price, weight, and/or image each.
Option Sets and Option Management
Bigcommerce Option Sets and Options can now be managed from SureDone.
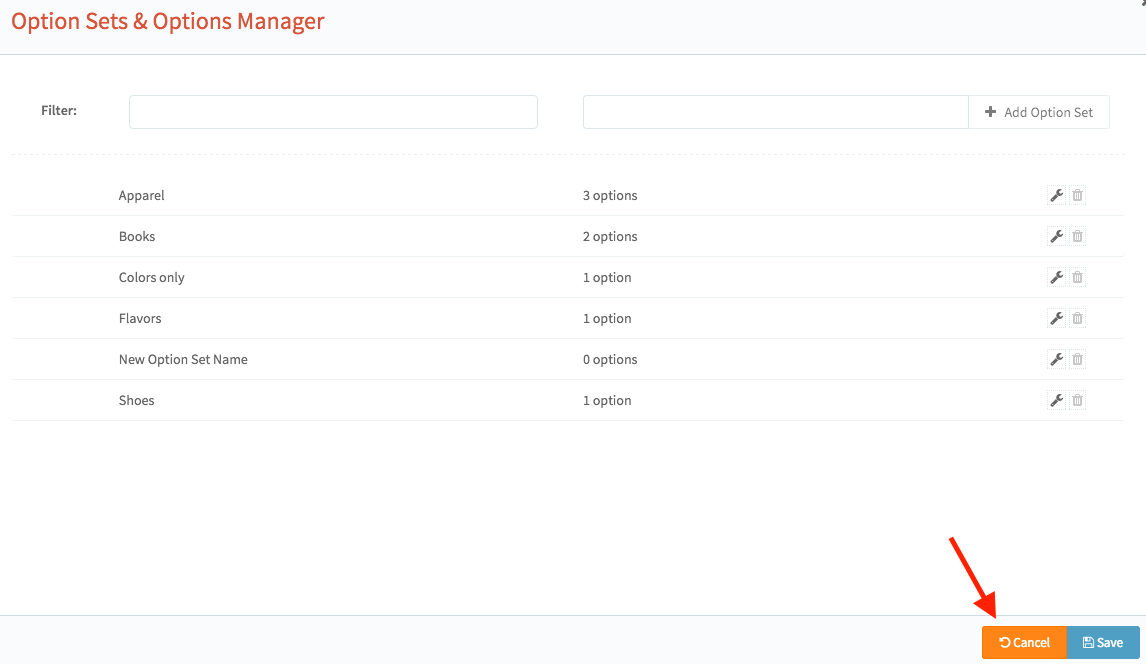
Creating a New Option Set
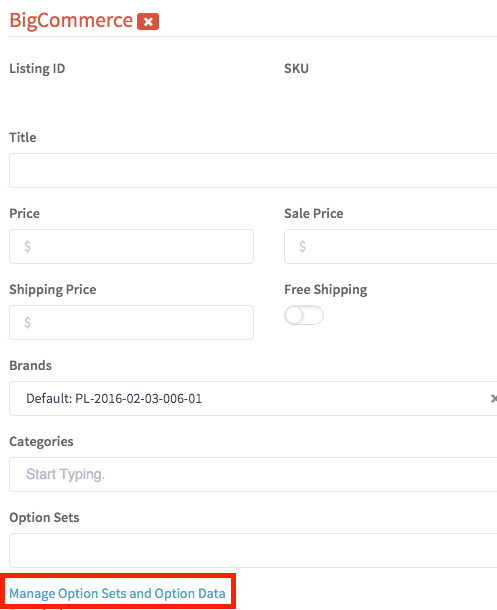
To create a new option set from within SureDone, first open the Option Set Manager. This modal is opened by clicking the “Manage Option Sets and Option Data” link, which is located on both the Bigcommerce Settings page (Settings > Plugins > Bigcommerce) and the Editor page (in the Bigcommerce section).
To open the Option Set Manager in the Bigcommerce Settings Page:
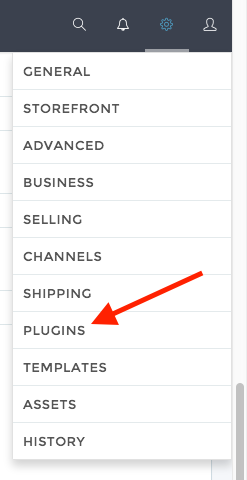
Click on “Plugins” in the Settings flyout menu:
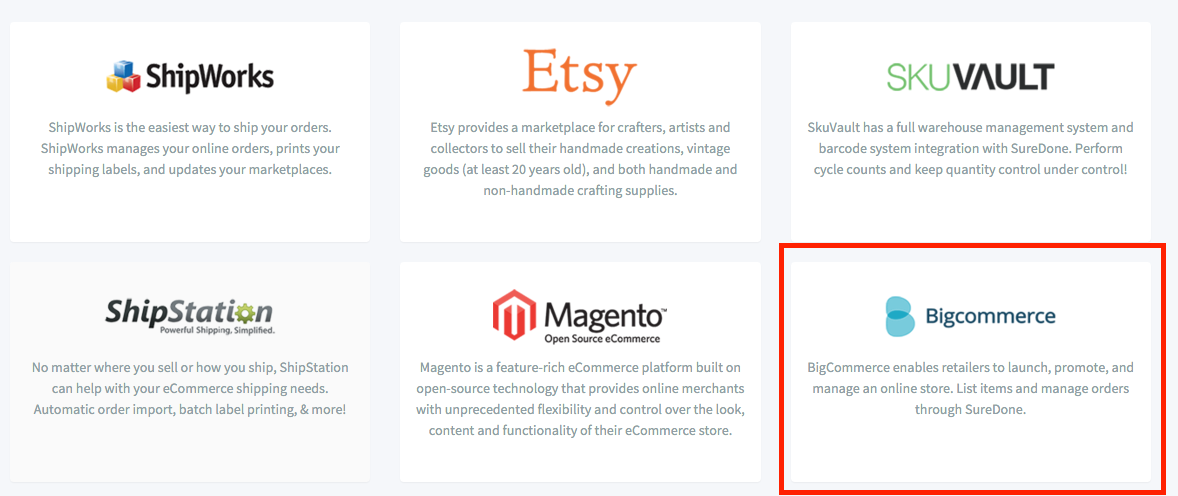
Then, click on the Bigcommerce link on the Plugin Settings page:
Then, on the Bigcommerce Plugin Settings page, click the “Manage Option Sets and Option Data” link:
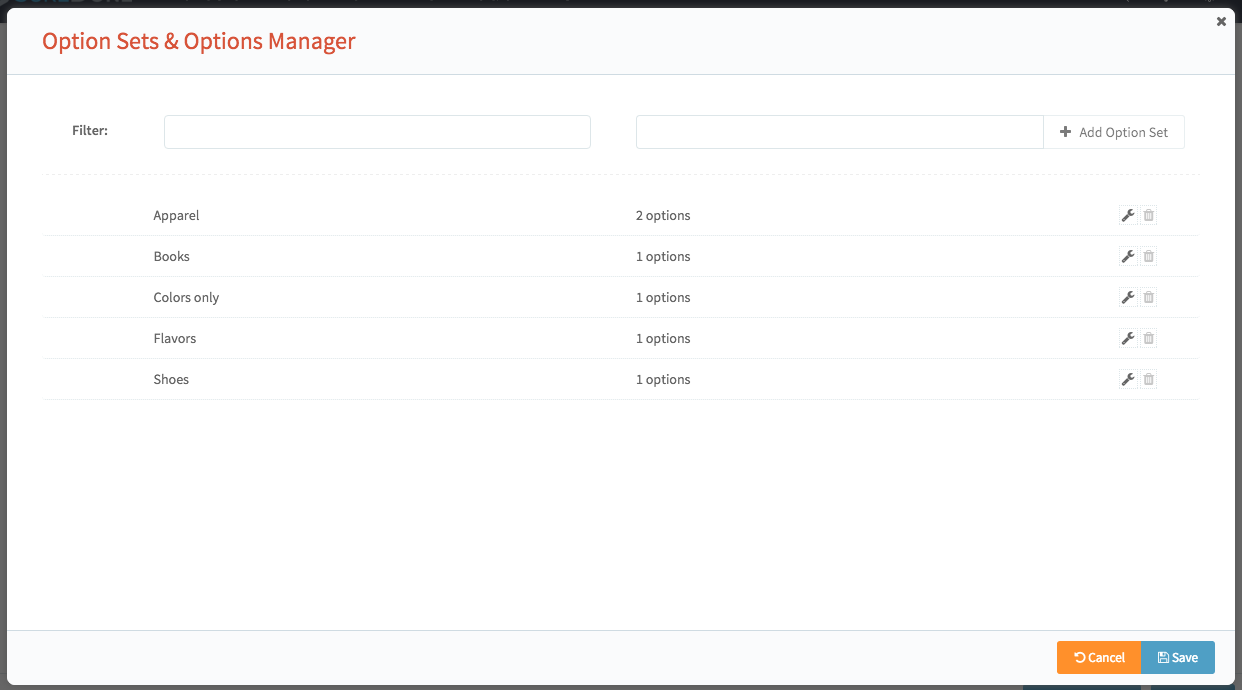
This will open the Option Set Manager:
To open the Option Set Manager from the Editor, click the “Manage Option Sets and Option Data” link in the Bigcommerce Section of the Editor Page:
Clicking this link will open the Option Set Manager modal.
Once the Option Set Manager modal is open, you will be able to create a new option set by entering the name of the new option set in the appropriate text field, highlighted here:
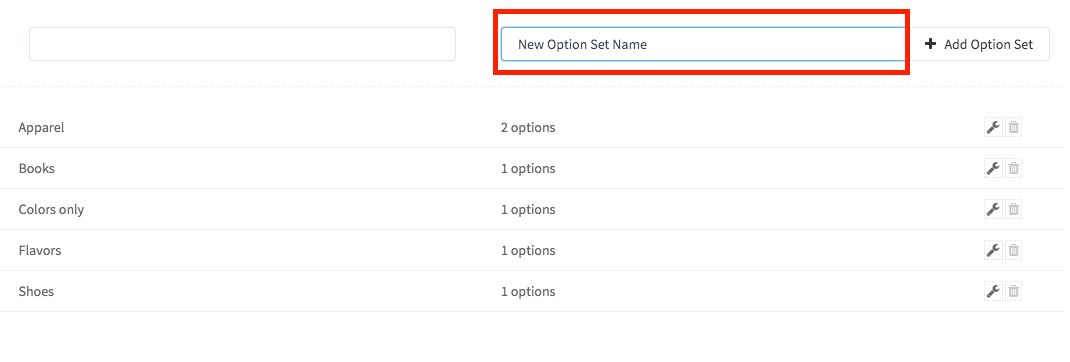
After entering the name of the option set you’d like to create, click the “Add Option Set” button, located next to the text field where you entered the option set name.

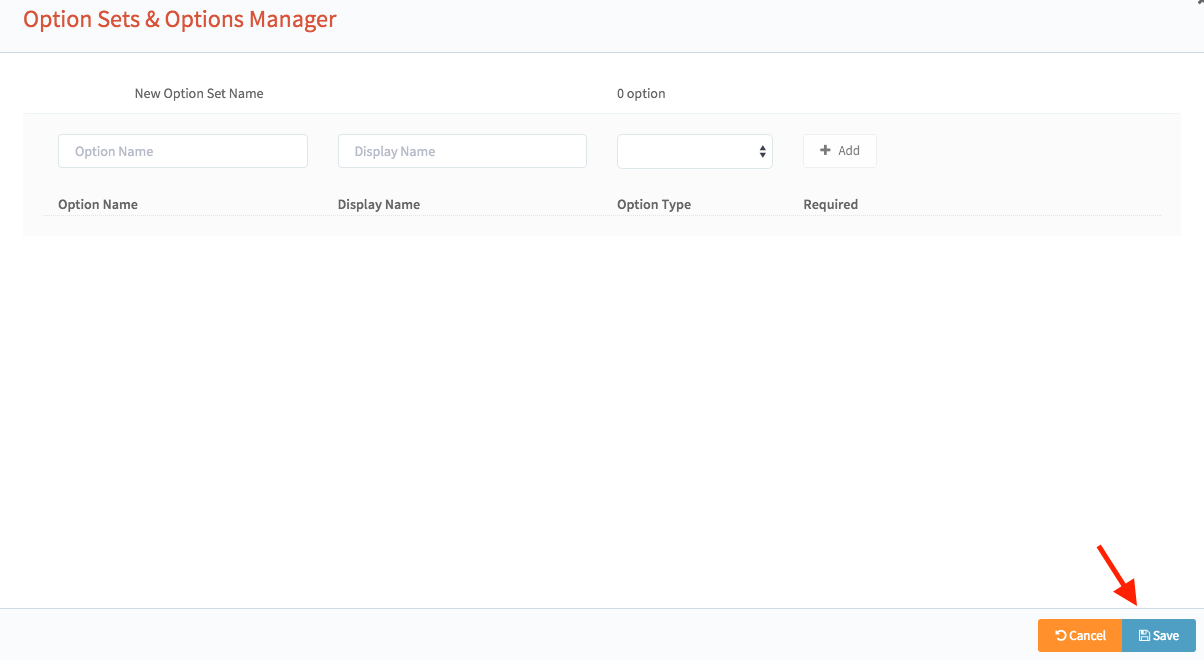
After clicking, a new, empty option set will be created and you’ll be given the opportunity to add options to your new option set. Read our sections on Adding a New Option to an Option Set and Adding an Existing Option to an Option Set to learn about how to add options to an option set.
For now, click the Save button to finish creating your new option set.
A loading screen will appear, and then you’ll be returned to the Option Set Manager beginning screen, and your new option set’s name will appear in the list of option sets.
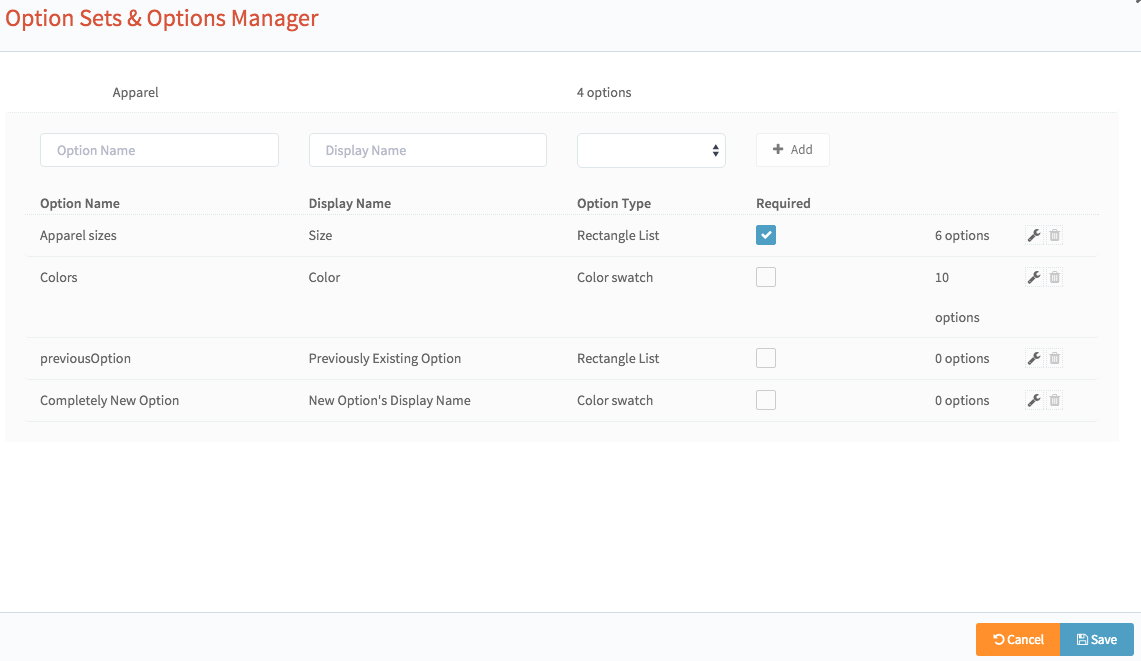
Editing an Existing Option Set
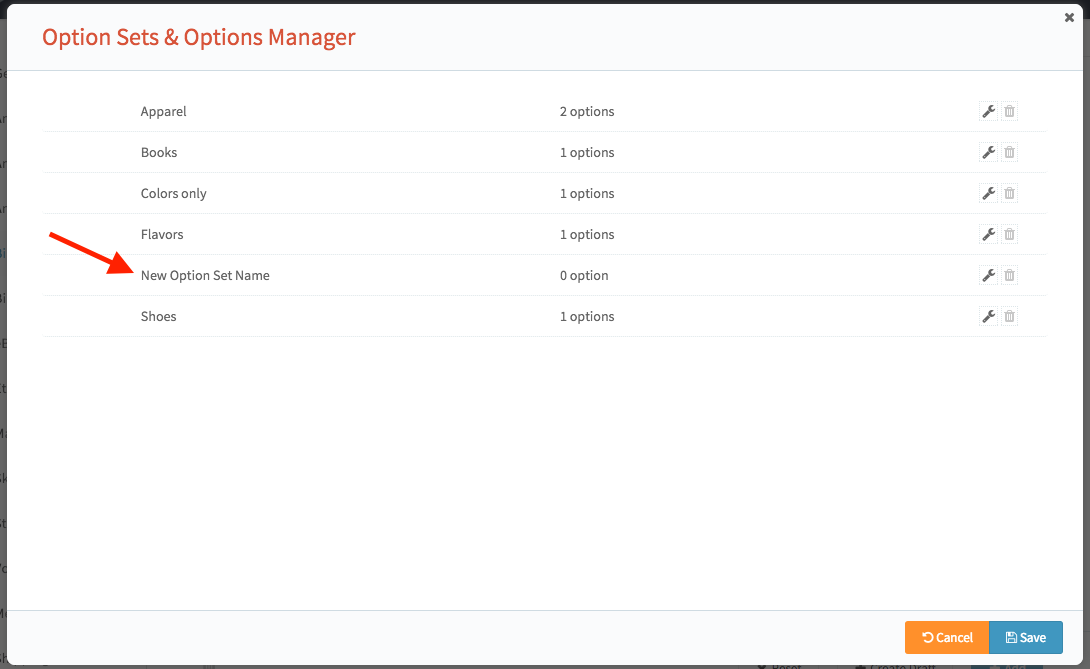
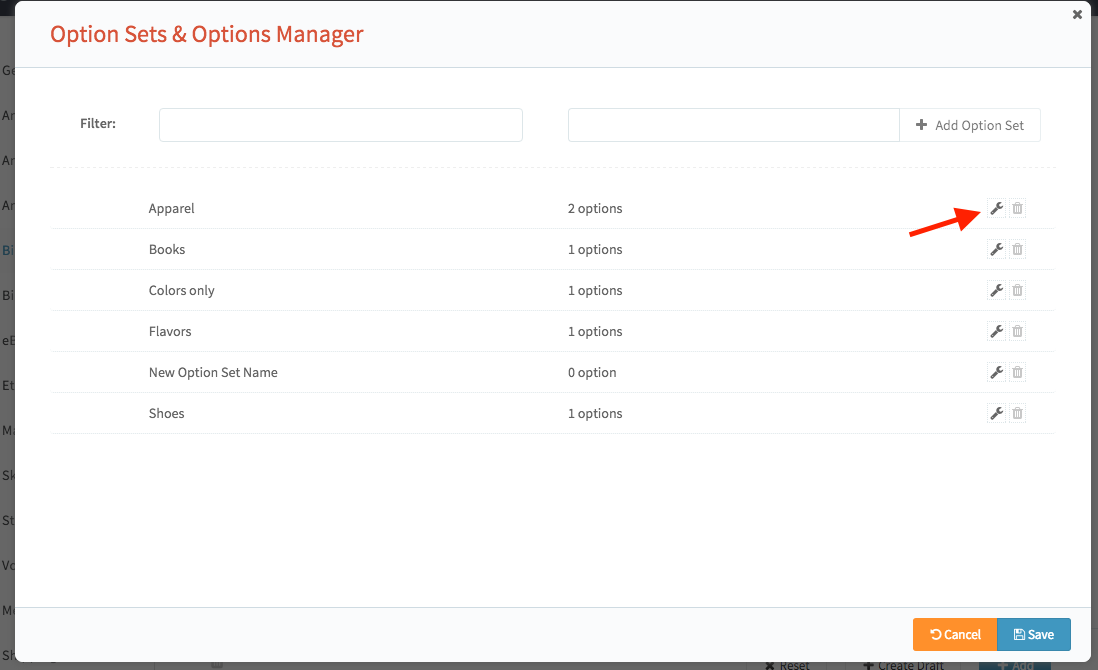
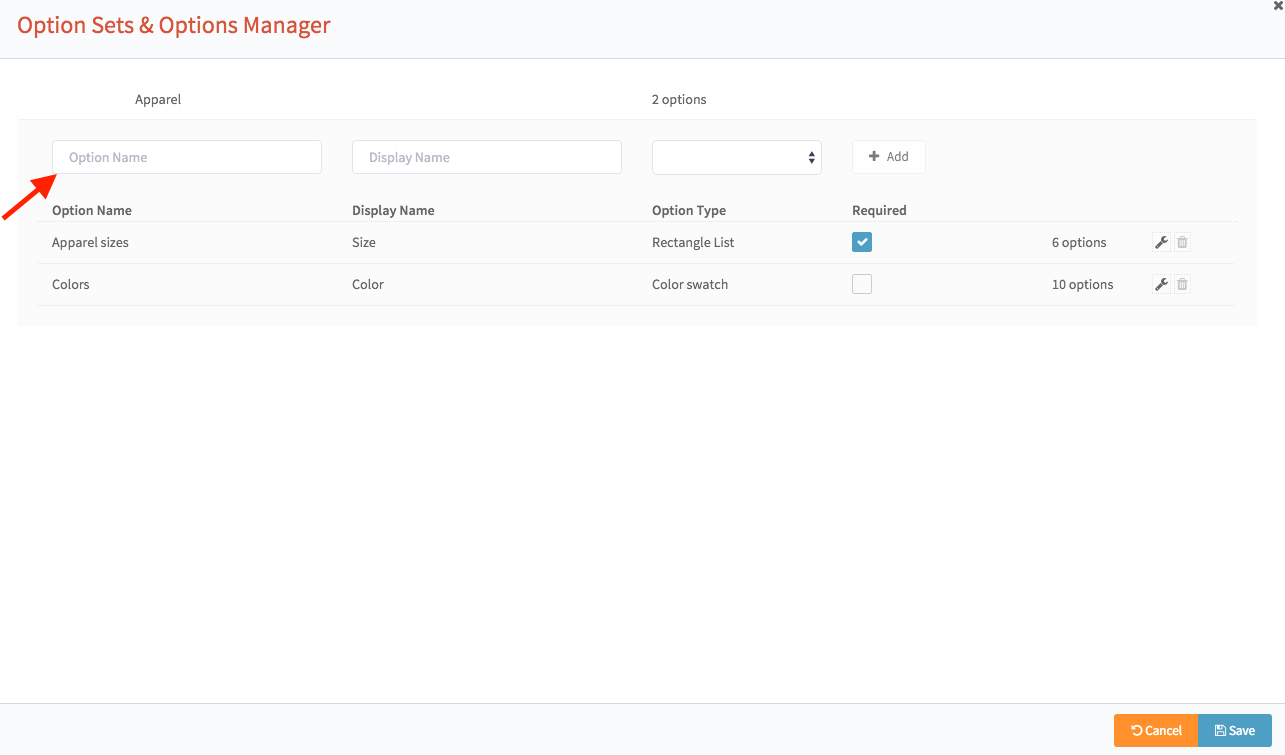
To edit an existing option set, click its wrench icon ( ). For example, if I wanted to edit the option set “Apparel”, I would click in the spot indicated:
After clicking the wrench icon, the options for that option set will be displayed.
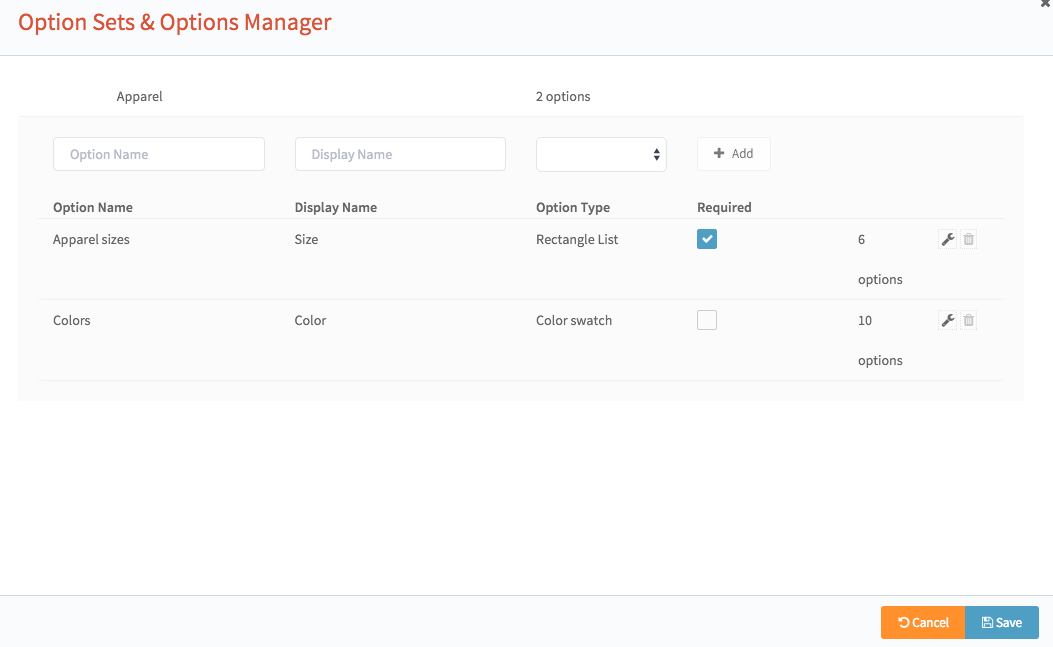
Here, you will be able to see, for each option in an option set, the Option Names, Display Names, Option Types, and whether that option requires a value.
You also have the ability to Add a New Option to an Option Set or Add an Existing Option to an Option Set.
Removing an Existing Option Set
To remove an existing option set, click the Delete icon next to the option set you’d like to remove.
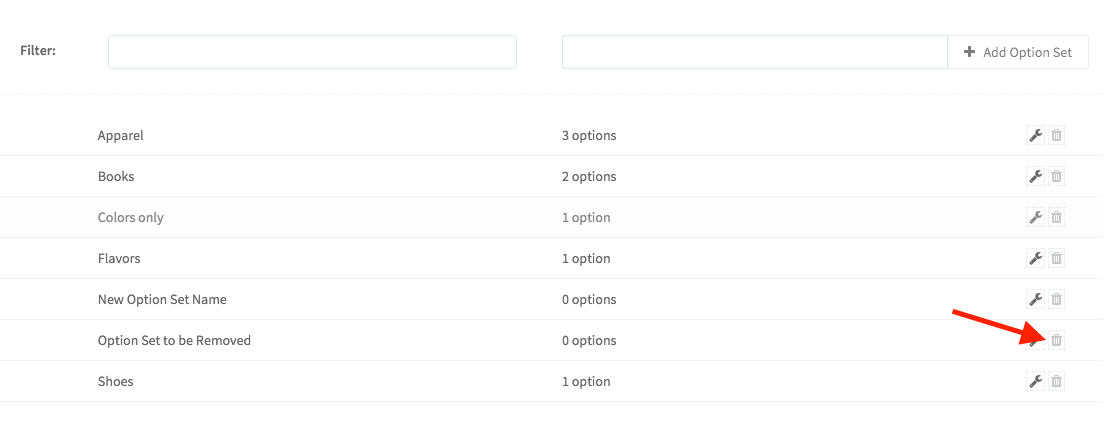
After clicking, the option set will be removed from the list of option sets. To save the removal, click the save button in the bottom-right corner of the Option Set Manager.
Note: Removing an option set like this will remove the option set from Bigcommerce, as well as any options inside of it that aren’t part of at least one other option set.
Adding an Existing Option to an Option Set
To add an option that already exists to an option set, click the wrench icon of an option set, as detailed in the Editing an Existing Option Set section.
Once in the option level, you can type in the name of the option you’d like to add in the Option Name field:
As you type in the name, it will show up as a suggestion in the Option Name field:
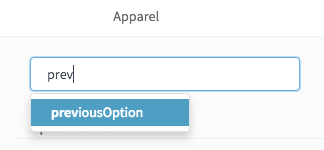
Clicking the suggested option name will automatically fill out the Option Name, Display Name, and Option Type fields with the selected option’s values, as shown.

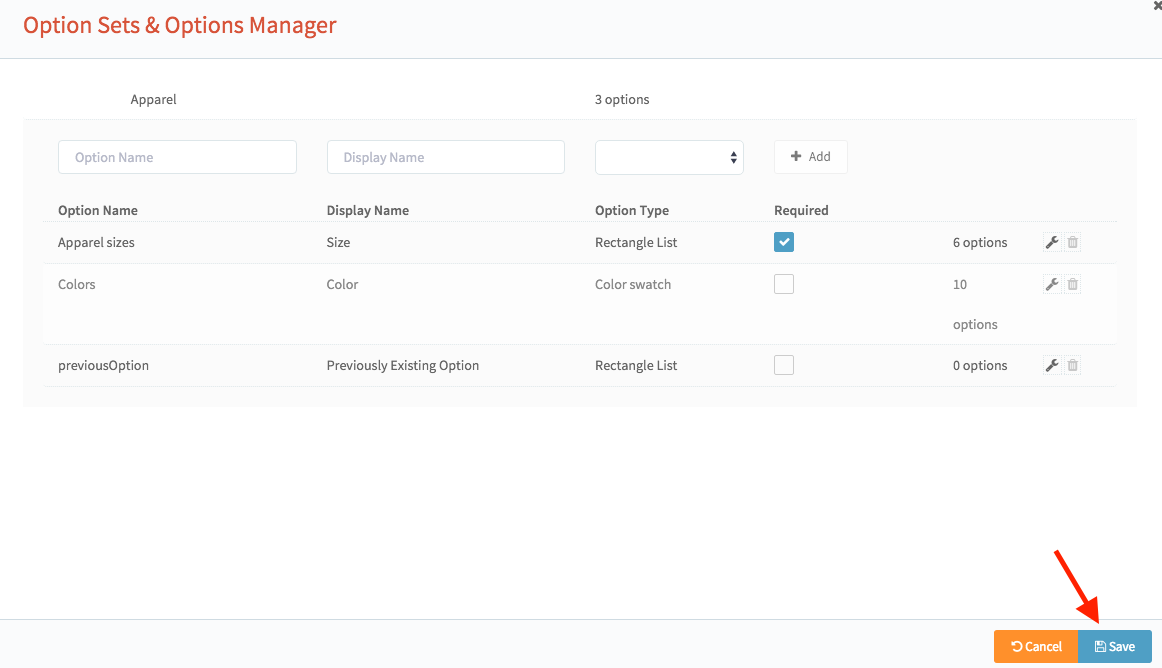
Next, click the “Add” button (indicated in the above image) to add the option to the option set.
After clicking the “Add” button, the new option will be added to the list of options within that option set. When it’s added, you will be able to check off the “Required” checkbox to indicate that this option is required for the option set you are editing. Leaving it unchecked means the option is not required.

Finally, click the “Save” button in the bottom-right corner of the Option Set Manager to save your changes.
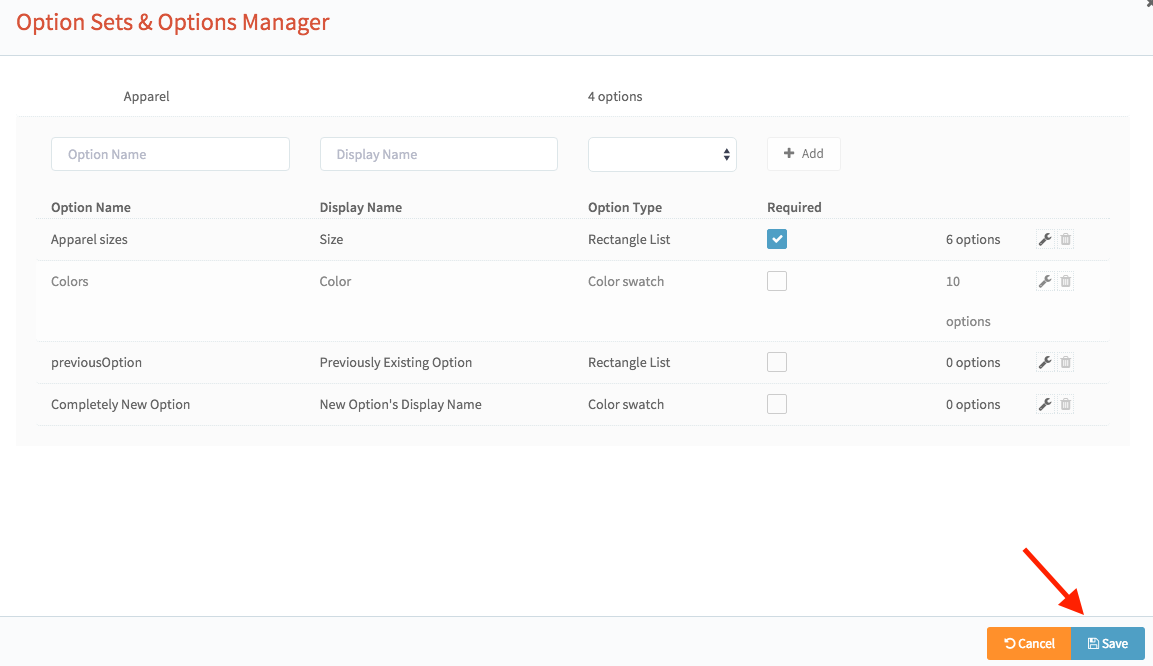
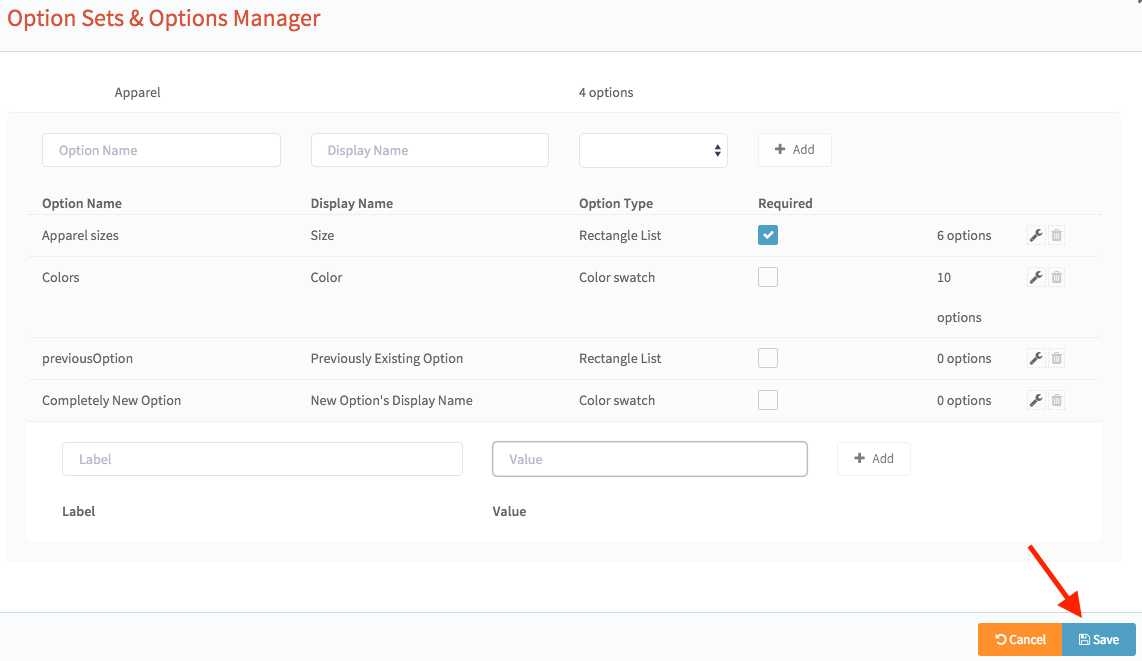
Adding a New Option to an Option Set
To add a brand new option to an option set, click the wrench icon of an option set, as detailed in the Editing an Existing Option Set section.
Once there, enter the Option Name, a Display Name, and select an Option Type from the dropdown. The following screenshot shows the Option Name, Display Name, and Option Type fields before they are filled out:

After filling out the fields, click the “Add” button.

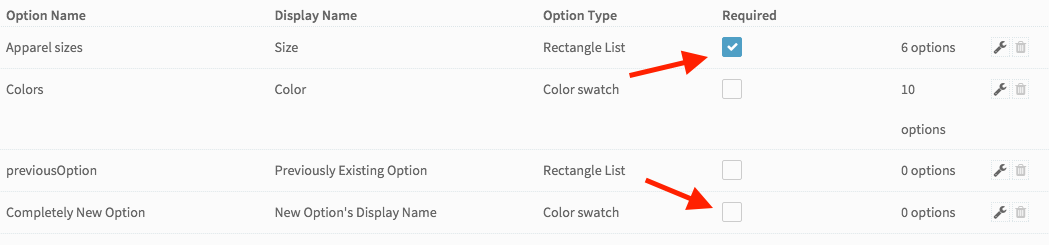
After clicking the “Add” button, the new option will be shown in the list of options. There, you can mark the item as required or not with the “Required” checkbox. In the following screenshot, the new option is not marked as required, while the option “Apparel sizes” is marked as required.
To finish, click the “Save” button in the bottom-right corner of the Option Set Manager to save your new option inside the option set.
Removing an Option from an Option Set
To remove an option from an option set, click the wrench icon of an option set, as detailed in the Editing an Existing Option Set section.
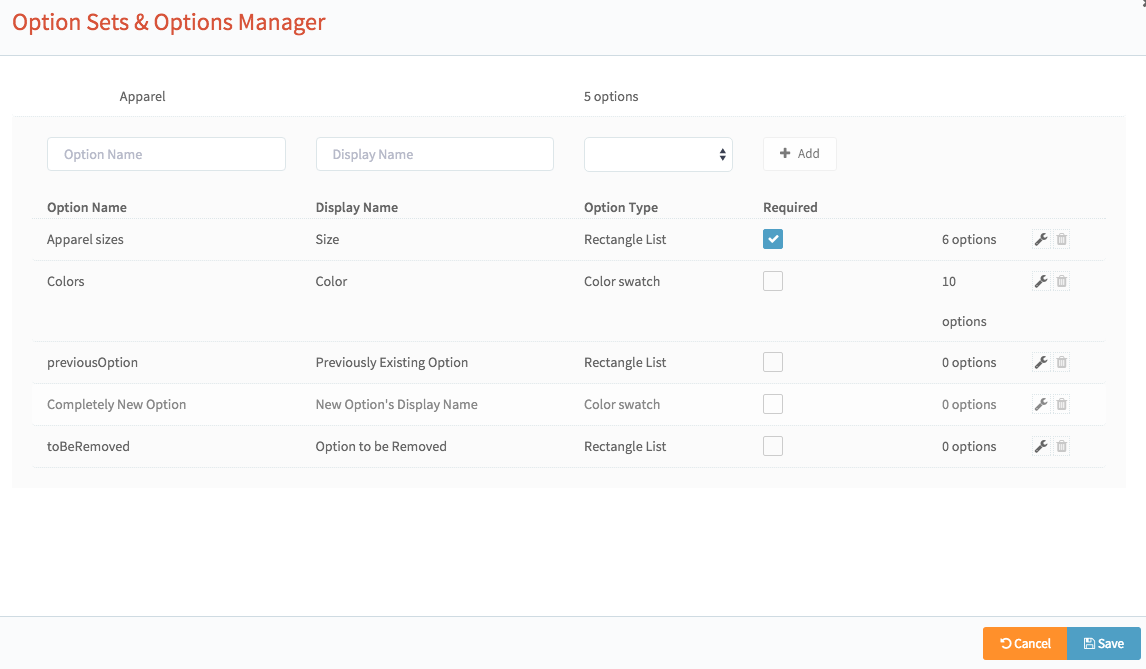
Once in the option level, you can remove an option by clicking the Delete icon ( ) After clicking the Delete icon, that option will be removed from the list of options.
To finish, click the “Save” button in the bottom-right corner of the Option Set Manager to save your changes.
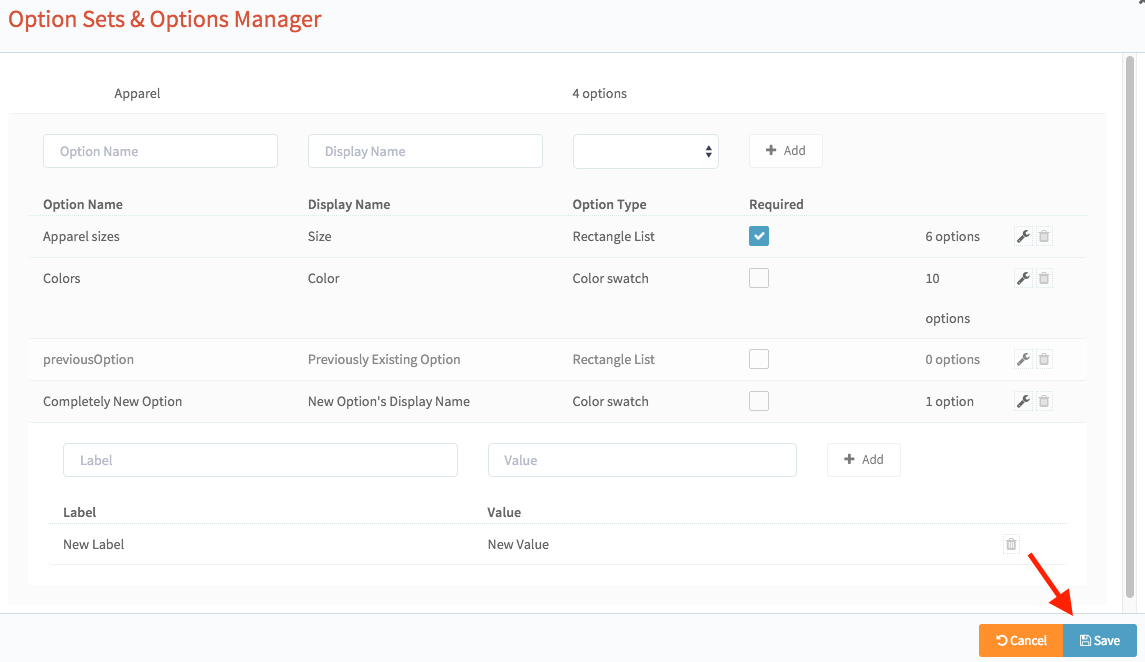
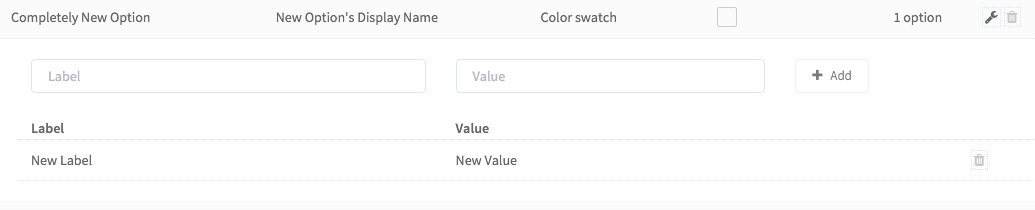
Adding an Option Value to an Option
To add a new value to an option, first click the wrench icon of an Option Set, as detailed in the Editing an Existing Option Set section.
Once on the option level of the Option Set Manager, click the wrench icon of the Option you’d like to add an option value to.

After clicking the wrench, the option Label and Value section of that option will expand.
For the following Option Types: Radio List, Rectangle List, and Select Box, enter in the same text for both the Label and Value fields. What you enter in the Label field will be displayed on the actual product page as the Label for one particular value of an option.
For Color Swatch option types, the Label field is the name of the color (e.g., “Green”) and the Value field is the hex code (e.g., “#00ff00”) of the desired color.

Then, enter the desired Label and Value and click the “Add” button. After clicking the “Add” button, the Labels and Values will be added to the option and shown in the list of that option’s labels and values, as shown in the following image.

Finally, click the “Save” button in the bottom-right of the Option Set Manager to save your changes.
Removing an Option Value from an Option
To remove a value from an option, first click the wrench icon of an Option Set, as detailed in the Editing an Existing Option Set section.
Once on the option level of the Option Set Manager, click the wrench icon of the Option you’d like to remove an option value from.
After clicking the wrench, the option Label and Value section of that option will expand.
To remove a value, click the Delete icon () beside the value you would like to remove. After clicking the Delete icon, the value will be removed from the list of values.
After removing all of the values you want to remove from an option, click the “Save” button in the bottom-right of the Option Set Manager to save your changes.
Reverting Changes
To revert any changes you have made, before you have saved them, click the “Cancel” button in the bottom-right of the Option Set Manager.
For example, if you’ve created a new option set, new option, or new option value and want to undo it, click the “Cancel” button. It will revert any changes that have happened since the last time the “Save” button was clicked.
Note: Clicking the “Cancel” button will only revert changes that have happened since the last time you clicked “Save”.
Filtering Option Sets
To filter the list of option sets, type in the filter box in the upper-left corner of the Option Set Manager.
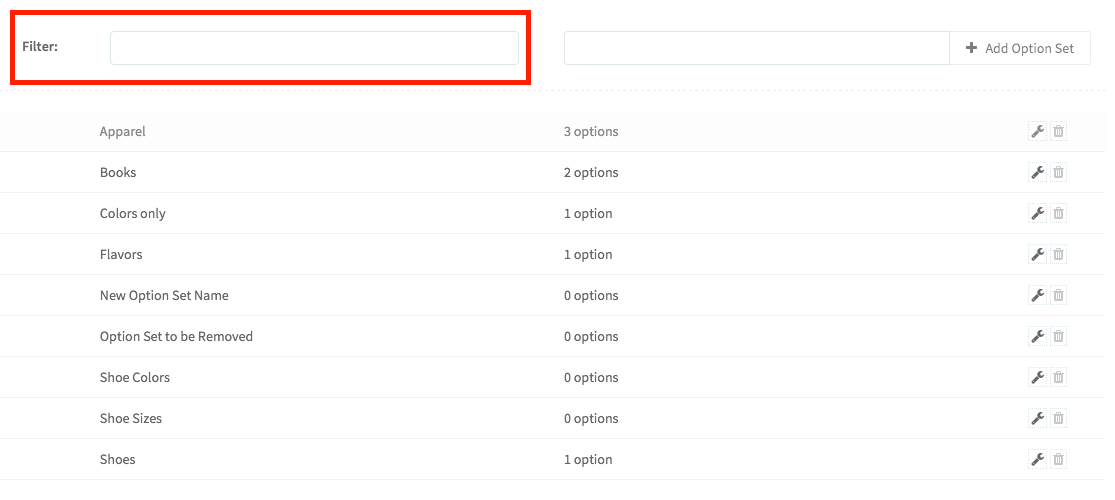
As text is entered in the filter, the list of option sets will hide any option sets that don’t contain the text in the filter field.
As an example, if you had the option sets “Shoes”, “Shoe Colors”, and “Shoe Sizes” along with other option sets, as shown in the screenshot above, you could enter “Shoe” in the filter box and then only the option sets with “Shoe” in their name would be shown.
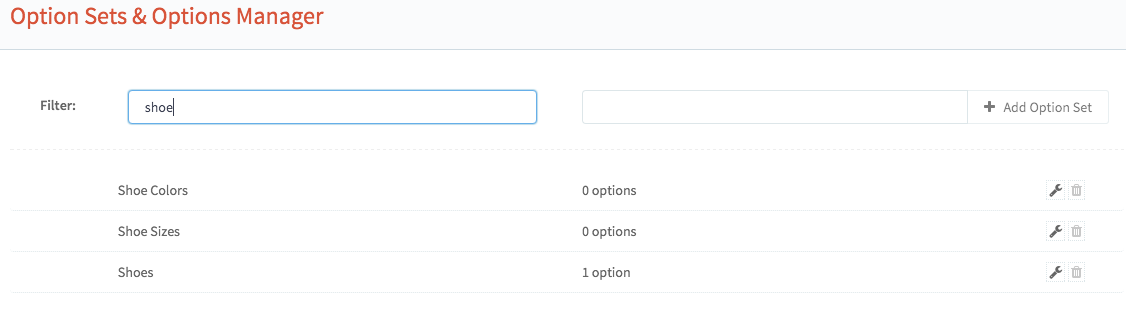
Being able to filter option sets should help you pare down large lists of option sets into a more manageable size.
Imports
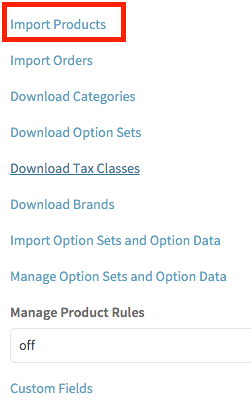
Importing Products from Bigcommerce
To import products from Bigcommerce, first go to Bigcommerce Plugin Settings in SureDone (Settings > Plugins > Bigcommerce).
Then, click the “Import Products” link on the settings page. This will schedule a file-only product import for your Bigcommerce instance to begin running within the next 15 minutes.
For more detailed information, see our guide on Bigcommerce Product Imports.
Note: during the Bigcommerce product import, any custom fields that exist in Bigcommerce and are not in your list of Bigcommerce Custom Fields in SureDone will be added automatically to your list of Bigcommerce Custom Fields in SureDone.
Importing Option Sets and Option Data from Bigcommerce
To import any option sets, options, and option values & labels from Bigcommerce, first go to the Bigcommerce Plugin Settings page (Settings > Plugins > Bigcommerce).
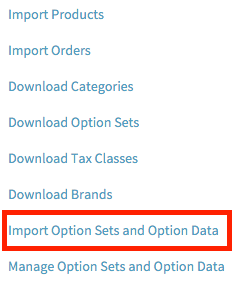
Next, click the “Import Option Sets and Options Data” link on the Bigcommerce Plugin Settings page. This will schedule an option data import to run within the next 15 minutes.
Once the import has completed, any option sets, options, and option values & labels from Bigcommerce that did not already exist in SureDone will be added to your Option Set dropdown on the Editor page, as well as the Option Set Manager modal.